今天Bear要介紹的是通知(Notification)!
這是一項很重要的技術概念, 不僅限於iOS內, 理解的話, 在進入一些如同嵌入式或是更廣泛的互動應用中都有相當的幫助
這篇除了介紹如何在iOS內使用通知中心的技術外, 也要提醒大家在一般實務開發時會遇到的一些可怕情形
不要因為好用而過度使用了噢!!
這是一項很重要的技術概念, 不僅限於iOS內, 理解的話, 在進入一些如同嵌入式或是更廣泛的互動應用中都有相當的幫助
這篇除了介紹如何在iOS內使用通知中心的技術外, 也要提醒大家在一般實務開發時會遇到的一些可怕情形
不要因為好用而過度使用了噢!!
前面我們已經學會了協定protocol的方法來跨class傳值了 (不知道協定Protocol 是什麼的請參考這連結)
今天Bear要教大家另一個傳值的方法 - Notification (通知)
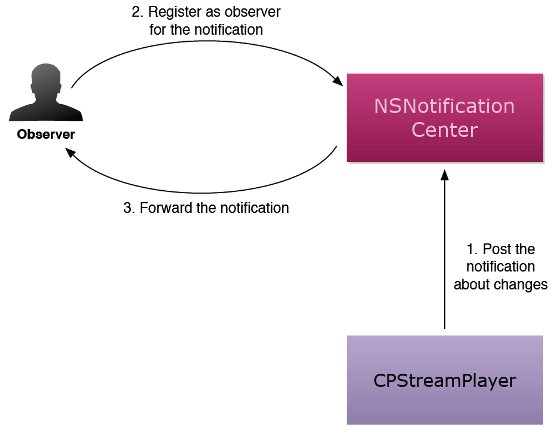
通知的原理很簡單,主要只有三個步驟
1.建立觀察者(add observer) - 接收訊息
2.發送廣播(post notification) - 發送訊息
3.移除觀察者(remove observer)
廣播會發送訊息給整個程式,而所有存在的觀察者接收到訊息時則會執行動作
因此我們可以做到跨類別的傳值或命令
好的..Bear相信剛接觸的人不知道這是什麼,
就讓我們直接來看範例吧
今天我們製作了一個繼承自UIBotton的TakoButton,這邊不清楚的請點這篇教學
今天Bear要教大家另一個傳值的方法 - Notification (通知)
通知的原理很簡單,主要只有三個步驟
1.建立觀察者(add observer) - 接收訊息
2.發送廣播(post notification) - 發送訊息
3.移除觀察者(remove observer)
廣播會發送訊息給整個程式,而所有存在的觀察者接收到訊息時則會執行動作
因此我們可以做到跨類別的傳值或命令
好的..Bear相信剛接觸的人不知道這是什麼,
就讓我們直接來看範例吧
今天我們製作了一個繼承自UIBotton的TakoButton,這邊不清楚的請點這篇教學
老規矩, Bear這邊先講一下今天範例的邏輯
1.在viewController裡面建立一個UIButton (綠色),及TakoButton(褐色)
2.每次點擊UIButton都會發送通知(Notification),TakoButton內有建立觀察者會接收訊息
3.點擊TakoButton會移除觀察者
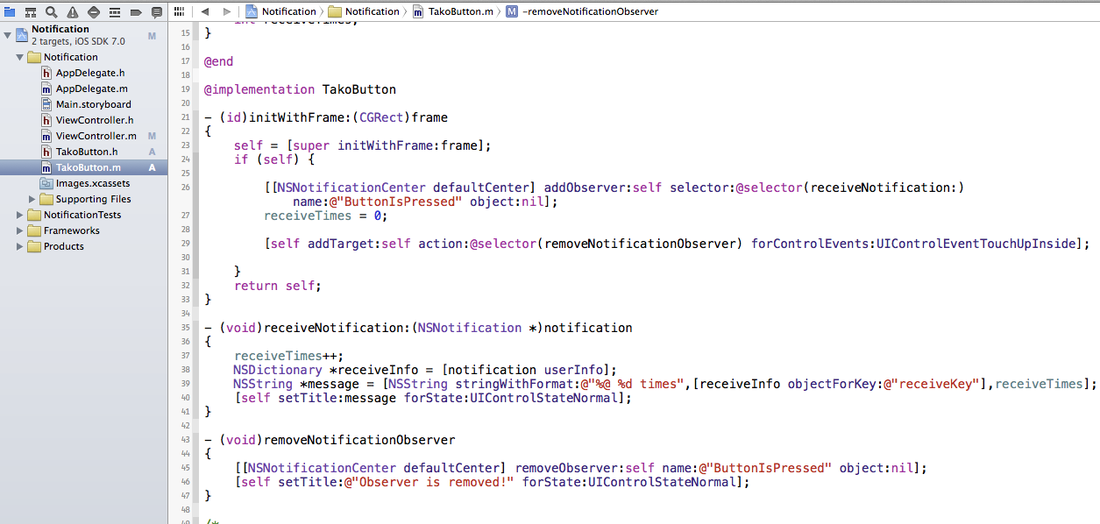
先讓我們看TakoButton內的程式碼
在 - (id)initWithFrame:(CGRect)frame 的地方
我們加入了一個觀察者,當接收到 @“ButtonIsPressed" 的訊息時,執行removeNotificationObserver 這個方法
[[NSNotificationCenter defaultCenter] addObserver:self selector:@selector(receiveNotification:) name:@"ButtonIsPressed" object:nil];
receiveTimes是一個全域變數,我們要用來計算接收到通知的次數
receiveTimes = 0;
而TakoButton本身被點擊的話則會執行 removeNotificationObserver 這個方法
[self addTarget:self action:@selector(removeNotificationObserver) forControlEvents:UIControlEventTouchUpInside];
注意: 發送通知的時候, 是可以帶參數過去的,
透過傳送一個名為userInfo的property,
在傳送通知(notification)時就能把你想要傳送的變數給傳送出去
userInfo為一個NSDictionary, 實際看一下以下的程式碼就能理解囉
- (void)receiveNotification:(NSNotification *)notification
{
receiveTimes++; //receiveTimes +1
NSDictionary *receiveInfo = [notification userInfo];//拿通知帶的userInfo
NSString *message = [NSString stringWithFormat:@"%@ %d times",[receiveInfo objectForKey:@"receiveKey"],receiveTimes];
[self setTitle:message forState:UIControlStateNormal];//在TakoButton上顯示接受次數
}
- (void)removeNotificationObserver
{
[[NSNotificationCenter defaultCenter] removeObserver:self name:@"ButtonIsPressed" object:nil];
//移除觀察者, 這邊要仔細說明一下, 是把觀察者(自己)有接收關於ButtonIsPressed的通知給通通移除掉, 但是其他的通知仍然會維持在自己身上
[self setTitle:@"Observer is removed!" forState:UIControlStateNormal]; //在TakoButton上顯示觀察者已被移除
}
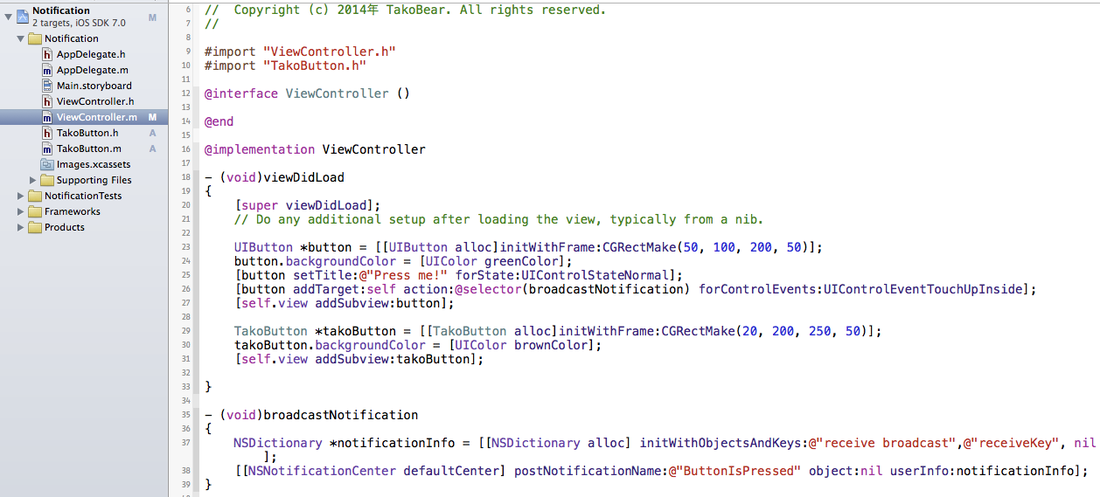
接著我們來看viewController的程式碼
最上面記得要import TakoButton.h
在 - (void)viewDidLoad 的時候我們建立兩個按鈕
UIButton *button = [[UIButton alloc]initWithFrame:CGRectMake(50, 100, 200, 50)];
button.backgroundColor = [UIColor greenColor];
[button setTitle:@"Press me!" forState:UIControlStateNormal];
[button addTarget:self action:@selector(broadcastNotification) forControlEvents:UIControlEventTouchUpInside];
[self.view addSubview:button];
TakoButton *takoButton = [[TakoButton alloc]initWithFrame:CGRectMake(20, 200, 250, 50)];
takoButton.backgroundColor = [UIColor brownColor];
[self.view addSubview:takoButton];
點擊UIButton時我們呼叫 broadcastNotification 方法
廣播一個名為 @“ButtonIsPressed" 的通知
並帶著一個內含一個NSDictionary 的userInfo
- (void)broadcastNotification
{
NSDictionary *notificationInfo = [[NSDictionary alloc] initWithObjectsAndKeys:@"receive broadcast",@"receiveKey", nil];
[[NSNotificationCenter defaultCenter] postNotificationName:@"ButtonIsPressed" object:nil userInfo:notificationInfo];
}
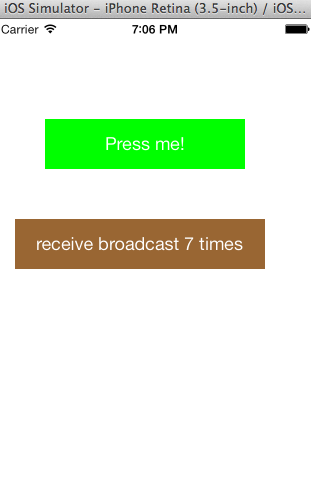
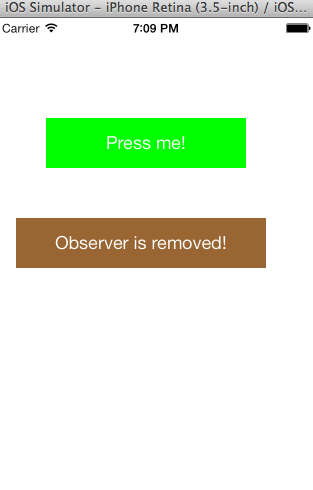
大功告成,使用我們的command+R來看成果吧!
點擊上方綠色的UIButton時,下方褐色的TakoButton會顯示接收到通知的次數
而點擊褐色的的TakoButton則會顯示觀察者已被移除
此時再點擊綠色的UIButton,褐色的的TakoButton則不會有任何反應
但其實通知仍在持續發送中,只是沒有觀察者在接收了
有興趣的朋友可以建立幾個TakoButton來試看看
沒被移除的觀察者仍會持續接受通知!
點擊上方綠色的UIButton時,下方褐色的TakoButton會顯示接收到通知的次數
而點擊褐色的的TakoButton則會顯示觀察者已被移除
此時再點擊綠色的UIButton,褐色的的TakoButton則不會有任何反應
但其實通知仍在持續發送中,只是沒有觀察者在接收了
有興趣的朋友可以建立幾個TakoButton來試看看
沒被移除的觀察者仍會持續接受通知!
 |  |
喜歡這篇文章嗎?
關於這次的教學可以在這邊下載得到喔!!
https://github.com/shouian/SimpleNotificationDemo.git
[入門系列]
1. Xcode 5 - 你的第一支Hello World iOS程式
2. Xcode 5 - UIView 與 UILabel
3. Xcode 5 - 第一顆互動按鈕 UIButton
4. Xcode 5 - 協定與委派
5. Xcode 5 - 如何建立表格 UITableView?
6. Xcode 5 - 什麼是通知中心?
[中級系列]
1. OpenSource - 可拖曳的UICollectionView (DraggableCollectionView)
2. 把Log記錄成文字檔 - Debug測試的好方法
3. 如何把訊息/圖片分享給其他App? (內含LINE, Skype, WhatsApp)
4. OpenSource - SHLineKit: 分享訊息/圖片到LINE上
[進階系列]
1. iOS 製作廣播電台
2. iOS 製作視訊串流
3. iOS 與Arduino製作藍芽聊天室
4. iOS 製作長曝光相機
5. iOS CoreblueTooth FrameWork
喜歡這篇文章嗎? 趕快加入Takobear粉絲團吧!
 RSS Feed
