上次Bear實驗室報導了如何用AudioToolbox播放mp3音樂
就有讀者詢問請問如果檔案格式是Apple 不支援的該怎麼辦呢?
別擔心, 上篇都說了是Part I,
這次進入到Part II 當然是來解決檔案格式不是Apple 支援的檔案囉!
注意! 本篇內容有點長, 讀者閱讀時請保持耐心....
另外注意本篇文章程式在iPhone 5s 恐有問題, 請謹慎注意內文說明
就有讀者詢問請問如果檔案格式是Apple 不支援的該怎麼辦呢?
別擔心, 上篇都說了是Part I,
這次進入到Part II 當然是來解決檔案格式不是Apple 支援的檔案囉!
注意! 本篇內容有點長, 讀者閱讀時請保持耐心....
另外注意本篇文章程式在iPhone 5s 恐有問題, 請謹慎注意內文說明
為避免大家記憶模糊, 讓Bear跟大家先重新復習一下, 如何判斷檔案格式是不是Apple 支援的呢?
很簡單, 只要看你的URL能不能被打開就是了!!
+ (void)printFileStreamBasicDescriptionFromFile:(NSString *)filePath
{
OSStatus status;
UInt32 size = 0;
AudioFileID audioFile;
AudioStreamBasicDescription dataFormat;
// or you can use CFURLCreateFromFileSystemRepresentation to get the url
CFURLRef url = (CFURLRef)[NSURL fileURLWithPath:filePath];
// Open the audio file to playback
status = AudioFileOpenURL(url, kAudioFileReadPermission, 0, &audioFile);
if (size != noErr) {
NSLog(@"*** Error *** PlayAudio - play:Path: could not open audio file. Path given was: %@", filePath);
return;
} else {
NSLog(@"*** OK *** : %@", filePath);
}
size = sizeof(dataFormat);
AudioFileGetProperty(audioFile,
kAudioFilePropertyDataFormat,
&size,
&dataFormat);
if (size > 0) {
// Do something when you can get file property
}
AudioFileClose(audioFile);
CFRelease(url);
}
是不是很簡單呢?
只要AudioFileOpenURL執行後, status顯示不是noErr就表示他是屬於Apple支援的格式,
就可以依照之前的教學架構直接播放檔案的內容了喔!
(之前內容參考: 用AudioToolbox播放mp3音樂)
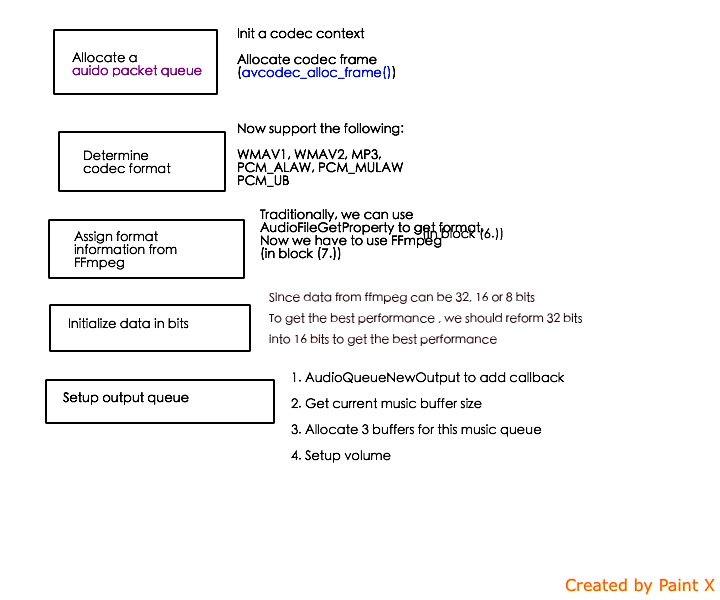
接下來規劃一下我們需要的播放器架構, 大家請看下圖
很簡單, 只要看你的URL能不能被打開就是了!!
+ (void)printFileStreamBasicDescriptionFromFile:(NSString *)filePath
{
OSStatus status;
UInt32 size = 0;
AudioFileID audioFile;
AudioStreamBasicDescription dataFormat;
// or you can use CFURLCreateFromFileSystemRepresentation to get the url
CFURLRef url = (CFURLRef)[NSURL fileURLWithPath:filePath];
// Open the audio file to playback
status = AudioFileOpenURL(url, kAudioFileReadPermission, 0, &audioFile);
if (size != noErr) {
NSLog(@"*** Error *** PlayAudio - play:Path: could not open audio file. Path given was: %@", filePath);
return;
} else {
NSLog(@"*** OK *** : %@", filePath);
}
size = sizeof(dataFormat);
AudioFileGetProperty(audioFile,
kAudioFilePropertyDataFormat,
&size,
&dataFormat);
if (size > 0) {
// Do something when you can get file property
}
AudioFileClose(audioFile);
CFRelease(url);
}
是不是很簡單呢?
只要AudioFileOpenURL執行後, status顯示不是noErr就表示他是屬於Apple支援的格式,
就可以依照之前的教學架構直接播放檔案的內容了喔!
(之前內容參考: 用AudioToolbox播放mp3音樂)
接下來規劃一下我們需要的播放器架構, 大家請看下圖

會不會覺得有點複雜呢?
其實我們只是把上次介紹的AudioPlayer所提供的method做了以下的變動
原本的SHAudioPlayer只有這個method:
- (id)initWithAudio:(NSString *)filePath;
這樣的概念中, 表示了我們的檔案路徑必須是Apple支援的格式, 而且原本的Player是只能播放不能停止,
同時也不能選擇其他codec來進行解析
所以這次我們擴增了Play, Stop, 還有在init的時候增加Codec的選擇
來擴增他的可用性
而Bear要使用的Codec就是FFmpeg了!
(對於FFmpeg不熟悉的朋友可以參考這篇: FFmpeg與iOS 6.1)
使用ffmpeg好處很多
包含可以支援其他不同遠端的協定(例如rtsp, mms, http)等等
也可以幫助我們對於一個音訊或是影像檔案成像時的概念作完整的理解!
對於上圖的說明, 在於我們要實際播放一個檔案時
每一段的音訊呈現(或是視訊呈現)都是由每一個frame 為單位
frame以一個數學概念來看就是矩陣Matrix
(Bear在這邊不做細節解釋, 讓Bear之後還能騙文章數!)
於是接下來讓Bear先介紹整個AudioPlayer的程式架構吧
看到AuidoPlayer.h的宣告如下
#import <Foundation/Foundation.h>
#import <AudioToolbox/AudioToolbox.h>
#import "AudioPacketQueue.h"
#include "libavformat/avformat.h"
#include "libavutil/opt.h"
#include "libswresample/swresample.h"
typedef enum {
eAudioRunning = 1,
eAudioStop = 2
}eAudioType;
@interface AudioPlayer : NSObject
@property BOOL bIsADTSAAS;
- (id)initAuido:(AudioPacketQueue *)audioQueue withCodecCtx:(AVCodecContext *)aCodecCtx;
- (void)play;
- (void)stop:(BOOL)bStopImmediatelly;
- (void)decodeAudioFile:(NSString *)filePathIn
toPCMFile:(NSString *)filePathOut
withCodecCtx:(AVCodecContext *)pAudioCodecCtx
withFormat:(AVFormatContext *)pFormatCtx
withStreamIdx:(int)audioStream;
- (int)getStatus;
- (int)putAVPacket:(AVPacket *)pkt;
- (int)getAVPacket:(AVPacket *)pkt;
- (void)freeAVPacket:(AVPacket *)pkt;
@end
接下來Bear就來一個個介紹每個method的架構了
首先到AudioPlayer.m檔內
你需要import的library如下:
#import "AudioPlayer.h"
#import <AVFoundation/AVFoundation.h>
#import "AudioUtilities.h"
// According to Apple guide, the number of audio queue buffers is recommended to 3
#define NUM_BUFFER 3
#define AVCODEC_MAX_AUDIO_FRAME_SIZE 192000
#define AUDIO_BUFFER_SECONDS 1
#define AUDIO_BUFFER_QUANTITY 3
#define DECODE_AUDIO_BY_FFMPEG 1
這邊定義了好幾個參數
NUM_BUFFER 代表會分配三段BUFFER 給AudioToolbox進行encoder, decoder, 這個數字是由Apple官方建議的
Bear就直接採用過來了!
接下來是Audio的單一frame最大大小為19200 bytes (約20kb)
另外兩個則不是如此重要, Bear這邊先偷懶不介紹
接下來我們看全域變數部分
@interface AudioPlayer ()
{
// == This is just refereneced from Apple Queue Service Programming Guide
// =============================================================
AudioStreamBasicDescription mDataFormat; // Represent the audio format
AudioQueueRef mQueue; // The playback audio queue created by this app
AudioQueueBufferRef mBuffers[NUM_BUFFER]; // An array holding pointers to the audio queue buffer
AudioFileID mAudioFile; // Audio file representing the audio file you want to play
UInt32 bufferByteSize; // size in bytes for each audio queue, use DervieBufferSize to get
SInt64 mCurrentPacket; // The packet index for the next packet to play in your audiio
UInt32 mNumPacketsToRead; // Number of packets to read on each audio queue's callback
AudioStreamPacketDescription *mPacketDescs; // For VBR audio data, the array of packet descriptions for the file being played. For CBR data, the value of this field is NULL.
bool mIsRunning; // A boolean value indicates the audio queue is running or not
// =============================================================
bool isFormatVBR;
AVCodecContext *aCodecCtx;
AudioPacketQueue *audioPacketQueue;
AVFrame *pAudioFrame;
SwrContext *pSwrCtx;
long lastStartTime;
}
- (UInt32)putAVPacketsIntoAudioQueue:(AudioQueueBufferRef)audioQueueBuffer;
- (int)DeriveBufferSize:(AudioStreamBasicDescription)ASBdescription withPakcetSize:(UInt32)maxPacketSize andSeconds:(Float64)seconds;
@end
接下來解析幾個重要的method
- (id)initAuido:(AudioPacketQueue *)audioQueue withCodecCtx:(AVCodecContext *)aCodecCtx
{
// 1. 初始化參數
int i = 0;
int audio_index = 1;
int vBufferSize = 0;
int err;
// 2. Support audio play when screen is locked
NSError *setCategoryError = nil;
NSError *activationError = nil;
[[AVAudioSession sharedInstance] setCategory:AVAudioSessionCategoryPlayback error:&setCategoryError];
[[AVAudioSession sharedInstance] setActive:YES error:&activationError];
// 3. 如果有建立過Queue, 直接設定, 沒有的話就進行初始化 = > 每一個Player只包含一個audio packet queue, 代表目前正在播放的音訊內容
if (audioQueue) {
audioPacketQueue = audioQueue;
} else {
audioPacketQueue = [[AudioPacketQueue alloc] initQueue];
}
// 4. 設定Codec的context內容, 以及用ffmpeg的API : avcodec_alloc_frame()初始化聲音的frame內容
aCodecCtx = pAudioCodecCtx;
pAudioFrame = avcodec_alloc_frame();
if (audio_index >= 0) {
// 5. 設定音訊格式內容, 使用AudioStreamBasicDescription這個結構體(struct)
AudioStreamBasicDescription audioFormat = {0};
audioFormat.mFormatID = -1;
audioFormat.mSampleRate = pAudioCodecCtx->sample_rate;
audioFormat.mFormatFlags = 0;
// 6. 利用Codec 的結構資訊: codec_id來判定要使用哪種解析格式播放音樂
switch (pAudioCodecCtx->codec_id) {
case AV_CODEC_ID_WMAV1:
case AV_CODEC_ID_WMAV2:
audioFormat.mFormatID = kAudioFormatLinearPCM;
break;
case AV_CODEC_ID_MP3:
audioFormat.mFormatID = kAudioFormatMPEGLayer3;
break;
case AV_CODEC_ID_AAC:
audioFormat.mFormatID = kAudioFormatMPEG4AAC;
audioFormat.mFormatFlags = kMPEG4Object_AAC_Main;
break;
case AV_CODEC_ID_PCM_ALAW:
audioFormat.mFormatID = kAudioFormatALaw;
break;
case AV_CODEC_ID_PCM_MULAW:
audioFormat.mFormatID = kAudioFormatULaw;
break;
case AV_CODEC_ID_PCM_U8:
audioFormat.mFormatID = kAudioFormatLinearPCM;
break;
default:
NSLog(@"Error: audio format '%s' (%d) is not supported", pAudioCodecCtx->codec_name, pAudioCodecCtx->codec_id);
audioFormat.mFormatID = kAudioFormatAC3;
break;
}
if (audioFormat.mFormatID != -1) {
// 7. 成功解析出來音訊以後, 把ffmpeg得到的資訊輸入給audioFormat (也就是 AudioStreamBasicDescription)
audioFormat.mFormatID = kAudioFormatLinearPCM;
audioFormat.mFormatFlags = kAudioFormatFlagsCanonical;
audioFormat.mSampleRate = pAudioCodecCtx->sample_rate;
audioFormat.mBitsPerChannel = 8 * av_get_bytes_per_sample(AV_SAMPLE_FMT_S16);
audioFormat.mChannelsPerFrame = pAudioCodecCtx->channels;
audioFormat.mBytesPerFrame = pAudioCodecCtx->channels * av_get_bytes_per_sample(AV_SAMPLE_FMT_S16);
audioFormat.mBytesPerPacket = pAudioCodecCtx->channels * av_get_bytes_per_sample(AV_SAMPLE_FMT_S16);
audioFormat.mFramesPerPacket = 1;
audioFormat.mReserved = 0;
// 8. 這邊很重要要注意的是: FFmpeg可能會使我們得到32, 16 或是8bits的聲音資料
// 如果得到32bits的結果, 必須要把它轉換成16bits (32bits 的關鍵字是AV_SAMPLE_FMT_FLTP)
// 不然播放時會有雜音產生! (16bits的關鍵字是AV_SAMPLE_FMT_S16)
// 我們使用swr_alloc_set_opts這個API就能直接進行重新分配sample rate了
// The default data defined by Apple is 16 bits
// If we got 32 or 8 bits, then convert it into 16 bits
if (pAudioCodecCtx->sample_fmt == AV_SAMPLE_FMT_FLTP) {
if (pAudioCodecCtx->channel_layout != 0) {
pSwrCtx = swr_alloc_set_opts(pSwrCtx,
pAudioCodecCtx->channel_layout,
AV_SAMPLE_FMT_S16,
pAudioCodecCtx->sample_rate,
pAudioCodecCtx->channel_layout,
AV_SAMPLE_FMT_FLTP,
pAudioCodecCtx->sample_rate,
0,
0);
} else {
pSwrCtx = swr_alloc_set_opts(pSwrCtx,
pAudioCodecCtx->channels + 1,
AV_SAMPLE_FMT_S16,
pAudioCodecCtx->sample_rate,
pAudioCodecCtx->channels+1,
AV_SAMPLE_FMT_FLTP,
pAudioCodecCtx->sample_rate,
0,
0);
}
NSLog(@"sample_rate=%d, channels=%d, channel_layout=%lld",pAudioCodecCtx->sample_rate, pAudioCodecCtx->channels, pAudioCodecCtx->channel_layout);
// 9. 初始化pSwrCtx, 這樣之後才能用它去顯現音訊的內容
if (swr_init(pSwrCtx)<0) {
NSLog(@"swr_init() for AV_SAMPLE_FMT_FLTP fail");
return nil;
}
} else if(pAudioCodecCtx->sample_fmt == AV_SAMPLE_FMT_S16P) {
pSwrCtx = swr_alloc_set_opts(pSwrCtx,
pAudioCodecCtx->channel_layout,
AV_SAMPLE_FMT_S16,
pAudioCodecCtx->sample_rate,
pAudioCodecCtx->channel_layout,
AV_SAMPLE_FMT_S16P,
pAudioCodecCtx->sample_rate,
0,
0);
if(swr_init(pSwrCtx)<0)
{
NSLog(@"swr_init() for AV_SAMPLE_FMT_S16P fail");
return nil;
}
} else if (pAudioCodecCtx->sample_fmt == AV_SAMPLE_FMT_U8)
{
pSwrCtx = swr_alloc_set_opts(pSwrCtx,
1,
AV_SAMPLE_FMT_S16,
pAudioCodecCtx->sample_rate, 1,
AV_SAMPLE_FMT_U8,
pAudioCodecCtx->sample_rate,
0,
0);
if(swr_init(pSwrCtx)<0)
{
NSLog(@"swr_init() fail");
return nil;
}
}
// 10. 配置完成sample rate有關的問題後, 使用AudioToolbox的API把callback加入到Queue裡面
if ((err = AudioQueueNewOutput(&audioFormat, HandleOutputBuffer, (void *)(self), NULL, NULL, 0, &mQueue)) != noErr) {
NSLog(@"Error creating audio output queue");
} else {
// Succeed to create a new queue to handle output buffer
if (pAudioCodecCtx->bit_rate == 0) {
pAudioCodecCtx->bit_rate = 0x100000; // 1048576 bits
}
if (pAudioCodecCtx->frame_size == 0) {
pAudioCodecCtx->frame_size = 1024;
}
// 11. 取出目前音訊格式的buffersize大小, 這邊是參考Apple官方example完成
vBufferSize = [self DeriveBufferSize:audioFormat withPakcetSize:pAudioCodecCtx->bit_rate/8 andSeconds:AUDIO_BUFFER_SECONDS];
// 12. 跑3個預先區分好的queue, 分配給每一個queue 的buffer大小好進行播放
for (i = 0; i < AUDIO_BUFFER_QUANTITY; i++) {
if ((err = AudioQueueAllocateBufferWithPacketDescriptions(mQueue, vBufferSize, 1, &mBuffers[i])) != noErr) {
NSLog(@"Error when allocating audio buffer");
// 13. 失敗的話停止播放
AudioQueueDispose(mQueue, YES);
break;
}
}
}
} /* End of if */
}
// 14. 設定播放音量大小
Float32 gain = 1.0;
AudioQueueSetParameter(mQueue, kAudioQueueParam_Volume, gain);
return self;
}
到這邊為止, 是最核心的初始化參數部分
接下來Bear會以架構圖概念來解釋整段Code的運作
有需要看原始碼部分的朋友直接到文章末的github連結下載Code就行囉!
第一段初始化的修改就是這樣!!
是不是有點巨大呢?
接下來部分內容會比較簡單
play的method中只要使用以下這一段程式碼會開始執行queue
AudioQueueStart(mQueue, nil);
stop的部分則可以利用
AudioQueueStop(mQueue, bStopImmediatelly); 停止播放
再來就是
檔案轉換的過程主要是以下三部分, 也就是使用FFmpeg把AAC檔案的格式給轉換成PCM檔案格式
也就是以下Method:
- (UInt32)putAVPacketsIntoAudioQueue:(AudioQueueBufferRef)audioQueueBuffer
對於Apple支援的AAC格式檔案, 這邊只需要把記憶體複製出來就行
那如果是Apple不支援的格式呢
則是採取以下步驟
1. 使用 FFMPEG 讀取 AVPacket
av_read_frame(pFormatCtx, & AudioPacket)
2. 將 AVPacket 解開為 AVFrame
av_samples_get_buffer_size(pAVFrame1) 用來取得frame的buffer大小
avcodec_decode_audio4(pAudioCodecCtx, pAudioFrame, &gotFrame, &AudioPacket);
3. 將 AVFrame 複製至 Audio Queue 對應的 buffer
此處需注意的是ffmpeg 所解開的檔案,其bitsPerSample 可能為32,16, 8 bits,若其bitsPerSample 不同,則需要進行轉換,以下的例子便需要將 AV_SAMPLE_FMT_FLTP (U32) 轉換至 AV_SAMPLE_FMT_S16 (S16),才能夠正常播放。否則播放時便會有許多雜音出現。
4. 轉換audio
outCount = swr_convert(pSwrCtx,
(uint8_t **)(&pOut),
in_samples,
(const uint8_t **)pAVFrame1->extended_data,
in_samples);
5. 轉換完成後去更新bufferRef的資訊:
bufferRef->mPacketDescriptions[bufferRef->mPacketDescriptionCount].mStartOffset = bufferRef->mAudioDataByteSize;
bufferRef->mPacketDescriptions[bufferRef->mPacketDescriptionCount].mDataByteSize = data_size;
bufferRef->mPacketDescriptions[bufferRef->mPacketDescriptionCount].mVariableFramesInPacket=1;
bufferRef->mAudioDataByteSize += data_size;
6. 更新資訊後重新加入到queue中
err = AudioQueueEnqueueBuffer(mQueue,
bufferRef,
0,
NULL))
至此, 我們就初步完成了新的Audio Player 架構了喔!
但是Bear實驗室的教學還沒結束
下一篇我們會實際應用這個player去制作網路收音機!
有興趣的版友千萬別錯過喔!
想先看到完整的程式碼只要到這邊下載就行了:
https://github.com/shouian/MMSRadioWithFFmpeg
下篇教學大家千萬別錯過喔!
更多有趣消息, 請繼續關注Takobear粉絲團!
 RSS Feed
